Three Walls
Add blocks at different heights until front, side, and top shadows match the target using the exact block count.
- Session
- Untimed spatial puzzles
- Controls
- Click or tap a grid cell to add or remove a block
- Best for
- Logic
Landscape gives you more room
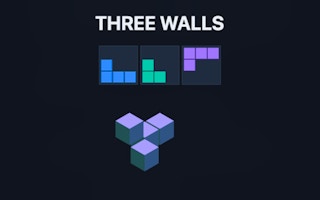
Build three matching shadows
Three Walls
Click or tap a grid cell to add or remove a block
Play loads a game hosted by GamePix that may show ads and use cookies.
Provided by GamePix. Ads and cookies may load only after you press Play. Read the GamePix Privacy and Cookie Policy.
Compare the front, side, and top shadow targets and the required block count.
How to play
How to Play Three Walls
Use the top shadow to choose occupied columns, then adjust heights to satisfy the front and side views.
- 01
Read the three target panels and the exact block count before placing anything.
- 02
Select a numbered height layer and click or tap a cell in the overhead grid to add a block.
- 03
Inspect the front, side, and top projections after the placement; look for missing or red extra squares.
- 04
Use the arrows to turn the model when overlapping blocks are difficult to distinguish.
- 05
Remove or move blocks until every view matches and the block count reaches the required number.
About the game
One model, three views, an exact budget
Three Walls asks you to construct a solid from blocks. The front, side, and top panels show the shadows the finished solid must cast. A placement can improve one view while creating an unwanted square in another, so the task is to satisfy all three at once. The required number of blocks adds another constraint: filling every position that might help a shadow can use too many pieces. Each cell and height choice should earn its place in the model.
The board offers a grid seen from above, numbered height layers, and arrows that turn the displayed model. Clicking a grid cell places or removes a block on the selected layer. After each change, compare the three target panels and the block counter. The game marks an extra projected square in red. That immediate feedback is valuable: it tells you a particular placement creates a shadow the target does not allow, even if the other two views appear closer.
Controls
Controls for Three Walls
- Click or tap a grid cell
- Add or remove a block on the selected height layer.
- Numbered layer buttons
- Change the height at which the grid places or removes blocks.
- Turn arrows
- Rotate the model view to inspect columns and stacked blocks.
- Retry
- Restart the current construction if you want a clean attempt.
Useful strategy
Use every projection as a constraint
- Begin with the top view to identify which footprint cells must be occupied.
- Check both side views before stacking a second block in a column.
- Treat a red square as evidence of an extra shadow, not just a color warning.
- Keep the target block count visible while filling missing squares.
- Turn the model to distinguish blocks that overlap from the current view.
- If all shadows match but the count is high, remove a block that is hidden behind another in each projection.
Start with the footprint from above
The top panel is the clearest way to establish which columns exist at all. A colored top-view square means that at least one block occupies that footprint cell. An uncolored square should generally remain empty; placing a block there can create an extra top shadow even if it helps a front view. Mark the required footprint mentally before choosing heights. This gives you a small set of columns to work with instead of treating every cell on the board as a possible answer.
A top-view match does not finish the puzzle. It only says that each required column has some height. The front and side panels determine how those heights must be distributed. Two blocks in the same footprint cell may make a taller front or side shadow without changing the top shadow. That distinction explains why a board can look correct from above while still missing a square on a wall. Use the numbered layer controls to add height deliberately, not by placing blocks at random.
The top view can also expose a common overbuilding mistake. If a front panel is missing a square, adding a block in a new footprint cell might solve that one view but violate the top panel. First ask whether raising a block in an already occupied column would create the needed wall shadow. This often preserves the correct footprint while changing the side or front projection. After the change, check whether another wall developed a red extra square.
Compare the front and side walls together
A front projection compresses depth: several blocks at different positions can occupy the same visible square from that direction. The side projection compresses width in a similar way. That means a missing front square does not identify a unique block to place. Find a candidate column that is allowed by the top panel, then check whether the side panel permits the required height. A placement that helps both wall views is stronger than one that repairs only one view.
Use the red extra-shadow feedback as a pruning tool. If a block creates red in the side panel, the side projection is telling you that the chosen position or height is not compatible with the target. Remove it, then try another allowed footprint column that could produce the same front square. If red appears in the top panel, the footprint itself is wrong. If red appears in the front panel, the block may be too high or in the wrong width position.
When the model becomes hard to read, turn it with the arrows. Rotation changes your view of the blocks so you can see whether a tall stack is hiding a shorter column. It does not change the target shadows or count as a move in the official controls. Use this inspection step before removing a block you are unsure about. Repeatedly clicking the same overhead cell without checking its active layer can remove or add a different block than you intended.
Solve the shadows with the exact block count
The block counter is not merely a progress bar. It is part of the solution. A model that casts all three target silhouettes can still be wrong if it uses too many blocks. This happens because a block may be hidden behind another block from every view. It changes the total but none of the projected squares. If your silhouettes match while the count is high, search for a redundant block rather than rebuilding the entire model.
Conversely, a low block count with matching-looking walls may mean a projection is being read too loosely. Inspect the highlighted target squares and the model at each layer. The game requires exact matches, not an approximate visual resemblance. A small block in the back can complete a side shadow without making a new front square, depending on what is already occupied. Use the target count to decide whether an additional block is plausible before placing it.
One useful sequence is to create the required top footprint with the fewest blocks, then add height only where a wall view demands it. After each addition, compare the total with the target. If you reach the target count while a wall still lacks a square, at least one existing block is serving the wrong purpose. Move or replace it rather than simply adding more. That constraint gives the puzzle its distinctive logic beyond ordinary shape fitting.
Fix a stuck model without guessing
When several panels disagree, stop and diagnose them separately. List which top cells are missing or extra, then which front and side squares are missing or red. Repair a footprint error first, because every later height choice depends on which columns exist. Next consider a height adjustment that improves both wall views. Only after the projections are close should you optimize the exact block count. This order prevents one hurried fix from breaking two already correct views.
If a cell click seems unhelpful, check the selected layer. The same overhead position can affect a different height depending on which numbered button is active. Confirm the layer and the block counter after the click. If the counter did not change, you may have clicked a control or inactive area. If it changed in the wrong direction, click the relevant cell again to undo that placement. The visible counters and colored projections are more reliable than remembering a long sequence of clicks.
Three Walls is untimed, so there is no reward for rushing past the evidence on screen. Treat each attempted block as a hypothesis about three views. A good hypothesis explains a missing square without creating an extra one and moves the total toward the required count. If it fails, remove it and try the next candidate column. Players who enjoy rotating a silhouette in Shadow Fit or assembling pieces in Puzzle Fit The Pieces will recognize the same visual reasoning here, with an added exact-count challenge.
Quick answers
Three Walls FAQ
What must match to finish a stage?
The constructed solid must match the front, side, and top target shadows and use exactly the displayed block count.
What does a red square mean?
It marks a shadow that your current model creates but the target does not require.
How do I change the height of a block?
Select a numbered layer on the right, then click or tap a cell in the overhead grid.
Do the turn arrows spend a move?
The official instructions describe turning the model as free inspection, so use the arrows to see stacked blocks clearly.
Game information
Game details
Three Walls runs through the official GamePix-hosted player. Airy Arcade does not host the game code.
- Distributor and host
- GamePix