Big Smash
Aim limited tennis balls at a stack of blocks and use each impact to clear the target structure.
- Session
- Short sessions
- Controls
- Move pointer or finger to aim
- Best for
- Physics
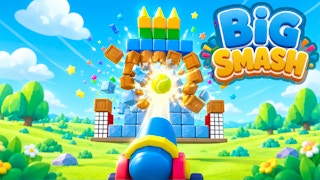
Topple the stack
Big Smash
Move pointer or finger to aim
Play loads a game hosted by GamePix that may show ads and use cookies.
Provided by GamePix. Ads and cookies may load only after you press Play. Read the GamePix Privacy and Cookie Policy.
Study the stack and the available ball count before firing.
How to play
How to Play Big Smash
Aim at the block structure, launch one ball, and use the observed motion and remaining ball count to choose your next shot.
- 01
Read the level label and the number of balls available. Look for blocks that appear to support several others or for a narrow lane into the stack.
- 02
Move your pointer or finger to the intended target. The player may show an aim line or other feedback; use the live display rather than an imagined trajectory.
- 03
Click or tap to launch a ball. The introductory prompt says to tap to throw, and the opening play confirmed a shot and a one-ball decrease.
- 04
Wait for the blocks to finish moving before aiming again. Decide whether the impact loosened the intended support or merely struck a surface piece.
- 05
Choose the next contact point from the new layout. Preserve the remaining balls for shots with a clear reason, especially when only a small section is left standing.
About the game
Spend each ball on a useful collision
Big Smash presents a stack of blocks and a limited supply of balls. The obvious move is to throw at the middle of the pile, but a stronger shot depends on what is holding the structure up. A ball can knock a piece away, unsettle neighbors, or miss the leverage point you wanted. The point of a run is to read the stack, choose a contact point, and learn from the resulting motion before spending another ball.
The first level we opened was labeled NINE TINS and showed a supply of ten balls. We launched one ball toward the visible target. A projectile crossed the play area and the counter changed from ten to nine. This verifies that the hosted player accepts a shot and consumes ammunition. It does not prove that the target was completely cleared, that the first level ended, or that a particular shot pattern works on every level.
The challenge is short enough to invite another attempt, but the limited counter makes aim meaningful. Watch the objects that actually move after a hit. A lower block may be a better target than a bright top piece if removing it causes several pieces to shift. Conversely, a crowded middle can soak up a ball without changing the arrangement you need to clear.
Controls
Controls for Big Smash
- Pointer movement or touch position
- Place your aim against the visible stack.
- Click or tap
- Launch a ball from the cannon or throwing point.
Useful strategy
Aim for structural change, not just a visible hit
- Study the bottom and middle layers before firing. A support piece may carry several blocks and make a better first target than an isolated top piece.
- Do not spend the next ball while the previous collision is still settling. A moving stack can expose a new opening or fall further without another shot.
- Use the ammo counter as a planning cue. After each launch, compare the number left with the amount of structure still standing.
- If a direct center shot barely changes the stack, shift your next aim to an edge or a low contact point rather than repeating the same line.
- Distinguish a clean miss from a weak impact. A miss calls for a trajectory adjustment; a weak impact calls for a different target or support point.
- Treat an optional ad-based ball offer as outside the basic challenge. Plan around the visible starting supply instead of assuming extra ammunition.
Identify which blocks carry the structure
The most visible block is not automatically the most useful one to strike. Before the first throw, identify the pieces touching the ground or forming a narrow column beneath a wider layer. If a hit removes or shifts one of those pieces, gravity may do more of the clearing than the ball itself. This is a general physics tactic, not a promise that any specific level has a single magic support.
Look for gaps between columns. A shot through an open lane can reach a lower or rear piece without spending its force on the front face. The live camera angle can make some gaps deceptive, so use a first shot as information. If the ball stops on the near side, adjust the next target based on where the collision actually occurred.
A stack that looks symmetrical can become lopsided after one hit. That is why the best second shot cannot be fully chosen before the first lands. Wait, then decide whether to push the heavy side, loosen a remaining column, or finish a small isolated piece.
Control one launch at a time
The game introduces the input as tapping to throw a ball. On desktop, a click launched the projectile in our test and reduced the visible supply by one. If the player displays a drag-to-aim cue, follow that cue to refine the trajectory before release. What matters is that the aim point belongs to the current level view, not to a remembered screen position from a previous round.
Avoid rapid double inputs. The counter is finite, and a second ball launched before you can observe the first may duplicate a poor shot. Release one, watch its path, and only then decide if the same target is still valuable. This makes each ball a small experiment rather than a stream of guesses.
If an input does not seem to launch, check whether the game is still on its intro prompt or whether the pointer is outside the active play region. The first successful action should show both a moving ball and an updated counter. Seeing only a loaded iframe or a level title is not enough to know the game is responding.
Make the ball budget part of your plan
Ten balls were visible at the start of the first observed level. Other stages may use different supplies, so read the current counter before firing. A limited supply does not require perfect accuracy, but it does reward a clear purpose for each shot. Decide whether you are testing the trajectory, attacking a support, or finishing an exposed piece.
After an impact, compare the remaining balls with the remaining task. If several heavy blocks still stand, prioritize shots that could move multiple pieces. When just one stubborn piece remains, a direct reliable hit may be better than another high-risk structural attempt.
The first level also displayed an optional ad-related extra-ball control. This guide does not rely on it. A browser player may show advertisements or offers, and their behavior can vary. You can evaluate the core puzzle with the ordinary starting supply and keep the attention on aim and collisions.
Learn from a miss or a weak impact
If the ball passes to one side of the stack, the problem is likely alignment. Use the miss as a reference point: move your aim toward the target by a modest amount rather than making a large blind correction. If the ball hits but nothing important falls, alignment may be fine while the target selection is weak.
A high hit can remove a decorative top piece yet leave the load-bearing base untouched. A low hit can also fail if the ball strikes a thick surface without shifting it. Watch which piece changes position and which pieces remain supported. Then select a new contact point with an expected physical effect.
If you run out of balls, restart as a fresh attempt and remember the most informative collision. Repeating every earlier shot exactly gives you the same problem. Change one decision, such as the first target or aim line, and compare the resulting stack before altering more of the sequence.
When to choose Big Smash
Big Smash suits players who like a short, visible cause-and-effect challenge. You see a stack, send a projectile, and judge the response. It is less about fast reactions than about selecting a useful impact under a small ammunition budget.
Arctic Bowling Battle on Airy Arcade offers another ball-based challenge, but its lane and pin arrangement ask for a different kind of alignment. Launch Missiles also uses aiming, yet its targets and projectile behavior differ. Use Big Smash when the satisfying part for you is knocking apart a block structure.
No guide can guarantee one-shot solutions across all levels. Treat the examples here as a method for observation: identify the supports, place an intentional shot, wait for the physics to settle, and revise. The visible state after each ball is the most reliable information for your next choice.
Quick answers
Big Smash FAQ
How do I throw a ball?
Aim inside the active player and click or tap. The first verified launch showed a projectile and changed the counter from ten balls to nine.
Should I always shoot the middle?
No. Inspect supporting blocks, open lanes, and the current shape of the stack. A useful lower hit may move more pieces than a surface hit.
What does the ball counter mean?
It shows the limited shots available for the current level. Read it before each launch and avoid spending a ball before the previous collision settles.
Was the first level completed in the test?
No. The bounded test confirmed the introductory level, a launched ball, and the ammunition decrement, but did not establish a level clear.
Do I need to watch an ad for extra balls?
No. An optional extra-ball control appeared in the player, but the core shooting challenge starts with a visible ordinary supply.
What if my shot hits without knocking much down?
That is useful feedback. Choose a different support or angle for the next ball rather than firing repeatedly at the same unproductive point.
Game information
Game details
Big Smash uses the official GamePix publisher player. The external player may show advertising or use cookies under GamePix terms.
- Distributor and host
- GamePix
More about this game
Keep the break going
Similar games

Clear your side of the ice
Arctic Bowling Battle
Move the penguin into bowling balls, send them across the ice, and finish with the cleaner side.
Choose your next impact
Just Another Alien Invasion
Aim meteors, spin a populated planet, and deepen craters toward its core.